Can Hair Be Dyed Permanently? Benefits, Risks, and Best Practices
If you’re wondering, can you permanently dye hair, the short answer is yes. Permanent hair dye is designed to change your hair color for the long term by penetrating the hair shaft and altering its natural pigment. Unlike temporary or semi-permanent dyes that fade after several washes, permanent hair color remains in the hair until it grows out or is chemically changed again.
Whether you want to cover gray hair, switch to a bold new shade, or maintain a consistent look, understanding how permanent hair dye works can help you achieve the best results while minimizing damage. This guide covers everything you need to know about permanent hair coloring, including benefits, drawbacks, and maintenance tips.
What Is Permanent Hair Dye?
Permanent hair dye is a type of hair color formulated to create long-lasting color changes. It uses a combination of color pigments and a developer, usually containing peroxide, to penetrate deep into the hair shaft.
The process changes the natural color of your hair rather than simply coating it. This is why permanent hair dye lasts much longer than temporary alternatives.
Definition of Permanent Hair Color
Permanent hair color is a chemical treatment that opens the hair cuticle and deposits color molecules inside the hair cortex. Once these molecules develop, they become trapped within the hair, creating a long-lasting color result.
Because the color is embedded within the hair structure, it cannot simply be washed away with shampoo.
How Permanent Hair Dye Works
Permanent hair dye works through a two-step chemical process:
- The developer opens the hair cuticle.
- Color molecules penetrate the cortex and react to form larger pigment molecules.
These larger molecules remain locked inside the hair shaft, providing durable color that withstands repeated washing.
Ingredients Used in Permanent Hair Color
Most permanent hair dyes contain:
- Color pigments
- Hydrogen peroxide developer
- Conditioning agents
- Alkalizing ingredients such as ammonia or ammonia alternatives
- Stabilizers and preservatives
These ingredients work together to lift natural pigment and replace it with the desired color.
Why Permanent Dye Lasts Longer Than Temporary Options
Temporary and semi-permanent dyes mainly coat the outside of the hair. Permanent dye penetrates deeply into the hair shaft, creating a more stable color change.
As a result, permanent hair dye:
- Covers gray hair more effectively
- Provides richer color depth
- Requires fewer full-color applications
- Delivers longer-lasting results
Can You Permanently Dye Any Hair Color?
Most hair colors can be permanently dyed, but the process and results vary depending on your starting shade, hair condition, and desired outcome.
Some color transformations are easier than others. For example, going darker is generally simpler than going significantly lighter.
Dyeing Dark Hair Permanently
Dark hair can be permanently dyed in a wide range of shades. However, if you’re aiming for a much lighter color, bleaching may be necessary before applying the desired shade.
Popular options for dark hair include:
- Chocolate brown
- Auburn
- Burgundy
- Caramel highlights
- Blonde transformations
The darker your natural hair, the more lifting may be required to achieve lighter shades.
Dyeing Blonde Hair Permanently
Blonde hair is one of the most versatile bases for permanent color. It can easily be dyed darker, richer, or more vibrant without extensive preparation.
Popular permanent color choices for blondes include:
- Light brown
- Dark brown
- Copper
- Red
- Fashion colors
Because blonde hair is often more porous, proper aftercare is essential to maintain color vibrancy.
Dyeing Gray Hair Permanently
Permanent hair dye is one of the most effective solutions for covering gray hair. The formula penetrates resistant gray strands and provides consistent coverage that lasts until new growth appears.
People with significant gray hair often choose permanent color because it offers:
- Excellent gray coverage
- Natural-looking results
- Long-lasting color retention
- Better root blending
How Does Permanent Hair Dye Work?

Understanding how permanent hair dye works can help you make informed decisions about coloring your hair and maintaining healthy results. Permanent hair color changes the structure of the hair to create long-lasting color that resists washing and fading.
Opening the Hair Cuticle
The first step in the coloring process is opening the hair cuticle. The cuticle is the outer protective layer of the hair shaft. Permanent hair dye contains alkaline ingredients, such as ammonia or ammonia substitutes, that lift the cuticle and allow color molecules to enter the hair.
Without opening the cuticle, the dye would remain on the surface and wash away quickly.
Removing Natural Pigment
Once the cuticle is open, hydrogen peroxide helps break down some of the hair’s natural pigment, known as melanin. This process creates space inside the hair shaft for the new color molecules.
The amount of natural pigment removed depends on:
- Your starting hair color
- The developer strength
- The desired shade
- The processing time
Lighter hair colors usually require more pigment removal than darker shades.
Depositing New Color Molecules
After the natural pigment is altered, the dye deposits new color molecules into the hair cortex. These molecules combine and expand inside the hair shaft, creating the desired color.
This step determines:
- Color intensity
- Shade accuracy
- Gray coverage effectiveness
- Overall longevity
Because the pigments are deposited deep within the hair, the color remains much longer than temporary alternatives.
Color Locking Process
Once processing is complete, the hair is rinsed and conditioned. The cuticle partially closes, trapping the newly formed color molecules inside the hair shaft.
Although permanent hair dye does not completely wash out, gradual fading can occur due to:
- Frequent shampooing
- Sun exposure
- Chlorine
- Heat styling
- Environmental factors
This is why color-treated hair requires ongoing maintenance.
Benefits of Permanent Hair Dye
Permanent hair color remains one of the most popular coloring options because of its durability and versatility. Whether you’re covering gray hair or completely changing your appearance, permanent dye offers several advantages.
Long-Lasting Results
One of the biggest benefits of permanent hair dye is its longevity. Unlike temporary colors that disappear after a few washes, permanent dye stays in the hair until it grows out or is recolored.
Many people prefer permanent color because it reduces the need for constant reapplication.
Full Gray Coverage
Permanent hair dye is often the best choice for covering stubborn gray hair. The formula penetrates gray strands effectively and provides even, natural-looking results.
Benefits for gray coverage include:
- Better color saturation
- More uniform results
- Longer-lasting coverage
- Improved root blending
This makes permanent dye a favorite among people experiencing significant graying.
Wide Shade Selection
Permanent hair color is available in virtually every shade imaginable. Whether you want a natural appearance or a dramatic transformation, there are countless options to choose from.
Popular permanent shades include:
- Black
- Brown
- Blonde
- Red
- Copper
- Burgundy
- Fashion colors
The variety allows users to customize their look according to personal style and skin tone.
Less Frequent Reapplication
Because the color remains inside the hair shaft, permanent dye generally requires fewer full-color applications than semi-permanent or temporary products.
Most users only need:
- Root touch-ups every 4–8 weeks
- Occasional gloss treatments
- Color-refresh products as needed
This can save both time and money over the long term.
Professional-Looking Finish
Permanent hair color often delivers rich, vibrant, and multidimensional results. Modern formulas contain conditioning ingredients that improve shine and enhance the overall appearance of the hair.
Benefits include:
- Enhanced color depth
- Improved shine
- Better color consistency
- Natural-looking results
- Strong gray coverage
When applied correctly, permanent dye can create salon-quality results at home or in a professional setting.
Potential Drawbacks of Permanent Hair Dye
While permanent hair dye offers many benefits, it also comes with potential downsides. Understanding these risks can help you maintain healthier hair and avoid common coloring mistakes.
Hair Damage and Dryness
Permanent coloring involves chemical processes that alter the hair structure. Over time, repeated coloring may lead to:
- Dryness
- Split ends
- Breakage
- Increased porosity
- Reduced elasticity
Using deep conditioners and repairing treatments can help minimize damage.
Root Regrowth Maintenance
Although the color itself lasts, your natural hair continues to grow. This creates visible roots that often require regular touch-ups.
Root maintenance can become more noticeable when:
- Going significantly lighter
- Covering gray hair
- Choosing high-contrast shades
- Coloring very dark or very light hair
Most people schedule touch-ups every four to eight weeks.
Allergic Reactions
Some individuals may experience sensitivity to ingredients found in permanent hair dye, particularly color developers and dye intermediates.
Possible reactions include:
- Itching
- Redness
- Swelling
- Burning sensations
- Skin irritation
Performing a patch test before every application is highly recommended.
Color Correction Challenges
Changing or removing permanent hair color can be difficult. If the shade turns out darker, lighter, or warmer than expected, correcting it often requires additional chemical treatments.
Common correction issues include:
- Uneven color
- Brassiness
- Overly dark results
- Color buildup
- Multiple salon visits
For major color changes, professional assistance is often the safest option.
Increased Hair Care Requirements
Color-treated hair usually requires more maintenance than untreated hair. To preserve color and hair health, many people need specialized products and routines.
Recommended practices include:
- Using color-safe shampoos
- Limiting heat styling
- Deep conditioning weekly
- Protecting hair from UV exposure
- Avoiding excessive washing
Proper maintenance helps extend color life and reduce damage.
How Long Does Permanent Hair Dye Last?
One of the most common questions people ask is whether permanent hair dye truly lasts forever. While permanent hair color does not wash out completely like temporary dyes, it can fade over time and requires maintenance as new hair grows.
Average Lifespan of Permanent Color
Permanent hair dye typically lasts until the colored hair grows out or is chemically altered again. However, the vibrancy of the shade may gradually decrease over several weeks.
Most people notice:
- Visible root growth after 4–8 weeks
- Slight fading after several shampoos
- Reduced shine over time
- The need for touch-ups every 6–8 weeks
The exact lifespan varies depending on hair type, color choice, and maintenance routine.
Factors That Affect Color Longevity
Several factors influence how long permanent hair color stays vibrant.
Hair Porosity
Highly porous hair tends to lose color faster because the cuticle is more open, allowing pigment molecules to escape.
Shampoo Frequency
Frequent washing accelerates color fading. Washing your hair daily may shorten the lifespan of your color significantly.
Heat Styling
Blow dryers, curling irons, and flat irons can weaken color molecules and contribute to fading.
Sun Exposure
UV rays can break down hair pigments, especially in red, copper, and fashion-colored shades.
Water Quality
Hard water and chlorinated pools may cause color to fade or become dull faster than expected.
Why Permanent Dye Fades Over Time
Although permanent hair dye penetrates the hair shaft, some fading is normal. Daily wear and environmental exposure gradually break down color molecules.
Common causes of fading include:
- Shampoo ingredients
- Heat damage
- UV exposure
- Chemical treatments
- Mineral buildup from water
Darker shades generally retain their appearance longer than lighter or vibrant fashion colors.
Signs It’s Time for a Touch-Up
You may need a touch-up if you notice:
- Visible root growth
- Gray hair reappearing
- Uneven color
- Dullness or fading
- Loss of shine
Regular maintenance helps keep your hair color looking fresh and consistent.
Can Permanent Hair Dye Be Removed?
Many people assume permanent hair dye is impossible to remove, but that’s not entirely true. While permanent color is designed to last, there are several methods that can lighten, remove, or alter it.
Color Removers
Hair color removers are specially formulated products that shrink artificial color molecules inside the hair shaft, making them easier to wash out.
Benefits of color removers include:
- Less damaging than bleach
- Effective for correcting unwanted color
- Suitable for many permanent dyes
- Can help prepare hair for recoloring
Results vary depending on the dye used and how long it has been in the hair.
Bleaching Process
Bleach is one of the most effective methods for removing permanent hair color. It works by breaking down both artificial and natural pigments.
Bleaching can help:
- Lighten dark permanent color
- Remove color buildup
- Prepare hair for a new shade
- Correct major color mistakes
However, excessive bleaching may lead to dryness, breakage, and increased hair damage.
Professional Color Correction
For difficult cases, professional color correction is often the safest solution. Experienced colorists can assess the hair condition and choose the best approach for achieving the desired result.
Professional correction may involve:
- Color removal treatments
- Toners
- Highlighting techniques
- Controlled bleaching
- Multi-step coloring processes
This option is particularly useful when dealing with uneven or severely damaged color.
Growing Out Dyed Hair Naturally
Some people prefer to simply let the color grow out over time. This method avoids additional chemical processing and minimizes damage.
Ways to make the transition easier include:
- Blending roots with highlights
- Using root touch-up products
- Choosing low-maintenance styles
- Trimming regularly
Although it requires patience, growing out permanent color is often the healthiest option.
How to Permanently Dye Hair at Home

Dyeing your hair at home can save money and provide great results when done correctly. Proper preparation and application are essential for achieving even color and minimizing damage.
Choosing the Right Shade
Selecting the correct shade is one of the most important steps.
Consider:
- Your natural hair color
- Skin tone
- Eye color
- Gray hair percentage
- Desired maintenance level
For beginners, staying within one or two shades of your natural color often produces the most predictable results.
Performing a Patch Test
Before applying any permanent hair dye, perform a patch test according to the manufacturer’s instructions.
A patch test helps identify potential allergic reactions and should be completed at least 48 hours before coloring.
Never skip this step, even if you’ve used the product before.
Preparing Your Hair
Proper preparation improves color absorption and helps protect the hair.
Before coloring:
- Avoid washing your hair immediately beforehand
- Brush out tangles
- Wear old clothing
- Protect the hairline with petroleum jelly
- Gather all necessary tools
Having everything ready beforehand makes the process smoother and more accurate.
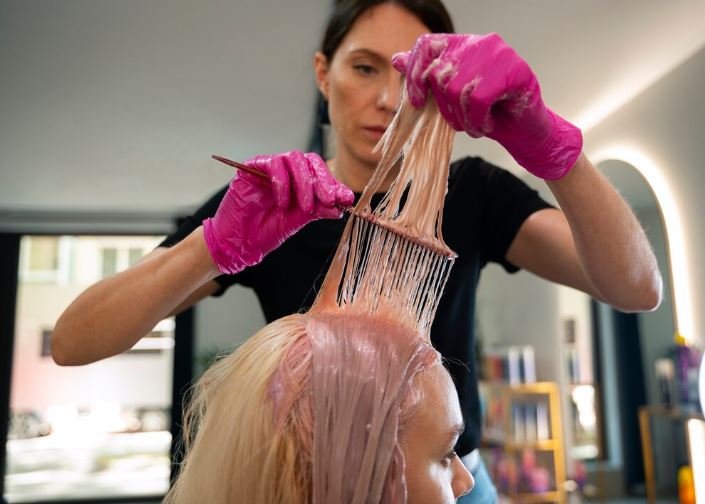
Step-by-Step Dye Application
Step 1: Mix the Color
Follow the manufacturer’s instructions carefully when combining the color and developer.
Step 2: Section the Hair
Divide the hair into manageable sections to ensure even application.
Step 3: Apply the Dye
Apply color from roots to ends or according to the instructions provided with the product.
Step 4: Process for the Recommended Time
Allow the dye to develop for the specified amount of time. Avoid leaving it on longer than recommended.
Step 5: Rinse Thoroughly
Rinse until the water runs clear and use the included conditioner to help seal the cuticle.
Aftercare Tips
Proper aftercare can significantly extend the life of your permanent hair color.
Best practices include:
- Use sulfate-free, color-safe shampoo
- Wash hair less frequently
- Deep condition weekly
- Limit heat styling
- Protect hair from sun exposure
- Use cool or lukewarm water when washing
These habits help preserve color vibrancy and maintain healthier hair over time.
Key Takeaway
Permanent hair dye offers long-lasting color, but it still requires maintenance and proper care. While the color itself remains in the hair until it grows out or is chemically altered, fading and root regrowth are inevitable. Understanding how long permanent dye lasts, how it can be removed, and how to apply it correctly at home will help you achieve better, longer-lasting results.
You can expand those sections with more depth and SEO value like this:
How to Make Permanent Hair Dye Last Longer
Even though permanent hair dye is designed to provide long-lasting results, proper maintenance is essential for keeping your color vibrant and your hair healthy. Factors such as washing habits, heat styling, sun exposure, and product choices can all impact how quickly your hair color fades. Following the right aftercare routine can help extend the life of your color and reduce the need for frequent touch-ups.
Use Color-Safe Shampoo
One of the easiest ways to preserve your hair color is by switching to a shampoo formulated specifically for color-treated hair. Traditional shampoos often contain harsh cleansing agents that strip away moisture and color pigments.
Look for shampoos that are:
- Sulfate-free
- Designed for color-treated hair
- Moisturizing and nourishing
- Gentle on the scalp and hair shaft
Color-safe shampoos help maintain shine, prevent dryness, and slow color fading between salon visits or at-home coloring sessions.
Avoid Excessive Heat Styling
Frequent use of heat tools can weaken the hair cuticle and cause color molecules to break down more quickly. High temperatures can also leave hair looking dull and dehydrated.
To minimize damage:
- Use the lowest effective heat setting
- Apply a heat protectant before styling
- Limit daily use of hot tools
- Air dry whenever possible
Reducing heat exposure helps maintain both hair color and overall hair health.
Protect Hair from UV Damage
Many people don’t realize that sunlight can fade hair color just as it fades clothing and furniture. UV rays break down color pigments, especially in red, copper, and fashion shades.
Protect your hair by:
- Wearing a hat during prolonged outdoor activities
- Using UV-protective hair sprays
- Staying in shaded areas when possible
- Avoiding excessive sun exposure during peak hours
These simple habits can significantly improve color retention.
Deep Condition Regularly
Permanent hair coloring can reduce moisture levels within the hair shaft. Deep conditioning treatments help replenish hydration and improve the appearance of color-treated hair.
Benefits of weekly deep conditioning include:
- Increased softness
- Improved shine
- Reduced frizz
- Less breakage
- Better color retention
Choose treatments containing ingredients such as argan oil, keratin, shea butter, or coconut oil for maximum hydration.
Wash Hair Less Frequently
Every shampoo session removes a small amount of color from the hair. Washing too often is one of the leading causes of premature fading.
To preserve your color:
- Wash hair only 2–3 times per week
- Use dry shampoo between washes
- Rinse with cool or lukewarm water
- Avoid clarifying shampoos unless necessary
Less frequent washing allows pigments to remain in the hair longer.
Schedule Regular Touch-Ups
Even the best permanent hair dye requires maintenance. Root regrowth becomes visible as your natural hair grows, especially when covering gray hair or making dramatic color changes.
Most people benefit from:
- Root touch-ups every 4–8 weeks
- Gloss treatments every 6–8 weeks
- Regular trims to maintain healthy ends
A consistent maintenance schedule helps your color stay fresh and polished.
Common Mistakes When Permanently Dyeing Hair
Permanent hair dye can produce beautiful results, but certain mistakes can lead to uneven color, excessive damage, or disappointing outcomes. Understanding these common errors can help you achieve a more professional-looking finish.
Choosing the Wrong Shade
One of the most common mistakes is selecting a color that is dramatically lighter or darker than your natural hair color without understanding the process involved.
Problems may include:
- Unexpected color results
- Visible root contrast
- Increased maintenance
- Multiple corrective treatments
For the most predictable outcome, stay within one to three shades of your natural hair color unless you’re prepared for additional processing.
Skipping the Strand Test
A strand test allows you to see how your hair will react to the dye before coloring your entire head.
Benefits of a strand test include:
- Previewing the final shade
- Checking processing time
- Identifying potential issues
- Avoiding unwanted surprises
This small step can save significant time and frustration later.
Overlapping Color on Previously Dyed Hair
Applying permanent dye repeatedly over already-colored hair can lead to color buildup and unnecessary damage.
Potential problems include:
- Excessive dryness
- Dark, uneven ends
- Increased breakage
- Difficult color corrections
When touching up your hair, focus primarily on new growth rather than previously colored sections.
Ignoring Hair Condition
Hair health plays a major role in color results. Severely damaged hair often absorbs color unevenly and may struggle to retain pigments.
Signs your hair may need repair before coloring:
- Split ends
- Excessive dryness
- Elastic or stretchy strands
- Frequent breakage
Using strengthening treatments before coloring can improve the final outcome.
Leaving Dye On Too Long
Many people believe leaving dye on longer will produce a richer color. In reality, exceeding the recommended processing time often increases damage without improving results.
Always follow the manufacturer’s instructions carefully for the safest and most effective outcome.
Frequently Asked Questions
Is permanent hair dye truly permanent?
Permanent hair dye permanently alters the colored portion of the hair shaft. However, the shade may gradually fade due to washing, heat styling, and environmental exposure. New hair growth will also require root touch-ups.
Can permanent dye damage hair?
Yes. Permanent coloring involves chemical processes that can weaken the hair structure over time. Proper aftercare, moisturizing treatments, and minimizing heat damage can help maintain healthier hair.
How often should you touch up roots?
Most people need root touch-ups every four to eight weeks. Those with significant gray hair or fast-growing hair may require more frequent maintenance.
Can you go from dark to blonde with permanent dye?
Usually not in a single application. Significant lightening often requires bleaching to remove enough natural pigment before achieving a blonde result.
Does permanent hair dye wash out completely?
No. Permanent dye remains inside the hair shaft until the hair grows out or is chemically altered. However, fading is normal and expected over time.
Can permanent hair dye cover stubborn gray hair?
Yes. Permanent hair color is generally considered the most effective option for covering resistant gray hair because it penetrates deeply into the hair shaft.
What is the safest permanent hair dye?
Products containing conditioning ingredients and ammonia-free formulas are often gentler on the hair and scalp. Regardless of the product, a patch test should always be performed before application.
Can I dye my hair permanently at home?
Yes. Many modern permanent hair dyes are designed for home use. Choosing the right shade, following instructions carefully, and performing patch and strand tests can improve your chances of achieving salon-quality results.
Final Verdict: Can You Permanently Dye Hair?
Yes, you can permanently dye your hair, and it remains one of the most effective methods for achieving long-lasting color transformation. Permanent hair dye works by opening the hair cuticle, altering natural pigment, and depositing new color molecules deep within the hair shaft. This process allows the color to remain in place until the hair grows out or undergoes another chemical treatment.
Permanent hair color is particularly beneficial for individuals seeking complete gray coverage, dramatic color changes, or a low-maintenance alternative to temporary dyes. It offers excellent longevity, vibrant color options, and reliable results when applied correctly.
However, permanent coloring also requires commitment. Regular root touch-ups, proper hair care, and moisturizing treatments are essential for maintaining healthy, vibrant hair. Understanding the benefits, risks, and maintenance requirements will help you make informed decisions and achieve the best possible results.
When paired with a quality hair care routine, permanent hair dye can deliver beautiful, confidence-boosting color that lasts for weeks while keeping your hair looking healthy, shiny, and well-maintained.

- 10 Best Hair Oil For Night Time Buyer Guide 2026 - October 25, 2026
- 10 Best Hair Oil For Nourishment Buyer Guide 2026 - October 25, 2026
- 10 Best Hair Oil For Natural Black Hair Buyer Guide 2026 - October 25, 2026