
Draw Hair That Looks Real: Your Ultimate Guide
Drawing realistic hair involves understanding form, light, texture, and individual strands, building from general shapes to fine details. Mastering the art of rendering hair is a pivotal skill that elevates character illustrations from merely good to truly captivating. This guide will meticulously detail the techniques necessary to convincingly render hair that looks real, reflecting light and movement with lifelike accuracy and depth. We will explore how professional artists approach this challenging yet rewarding aspect of character design, offering practical insights and actionable advice to transform your drawings.
Understanding the Fundamentals of Realistic Hair Drawing
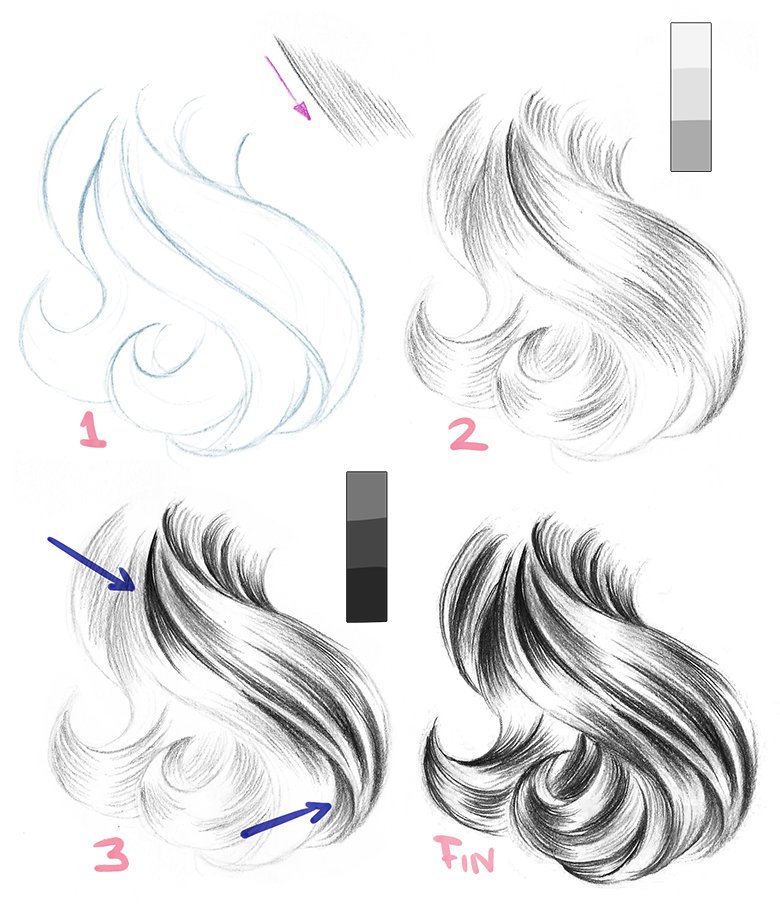
When approaching the task of how to draw hair that looks real, it is crucial to first shift our perspective from seeing hair as thousands of individual strands to understanding it as a cohesive mass with distinct forms. This foundational principle is paramount for creating believable volume and structure. Hair doesn't just sit on the head; it flows and drapes, influenced by gravity, wind, and its own texture, forming large, observable shapes.
The importance of form and volume cannot be overstated. Think of hair not as flat lines, but as three-dimensional objects. Just like any other form, hair has distinct planes that interact with light, creating highlights and shadows. Establishing this underlying structure early in your drawing process, using simple geometric shapes initially, will provide a robust framework upon which to build intricate details. Without a strong sense of volume, hair will appear flat and lifeless, failing to convey the natural softness and weight we observe in real life.
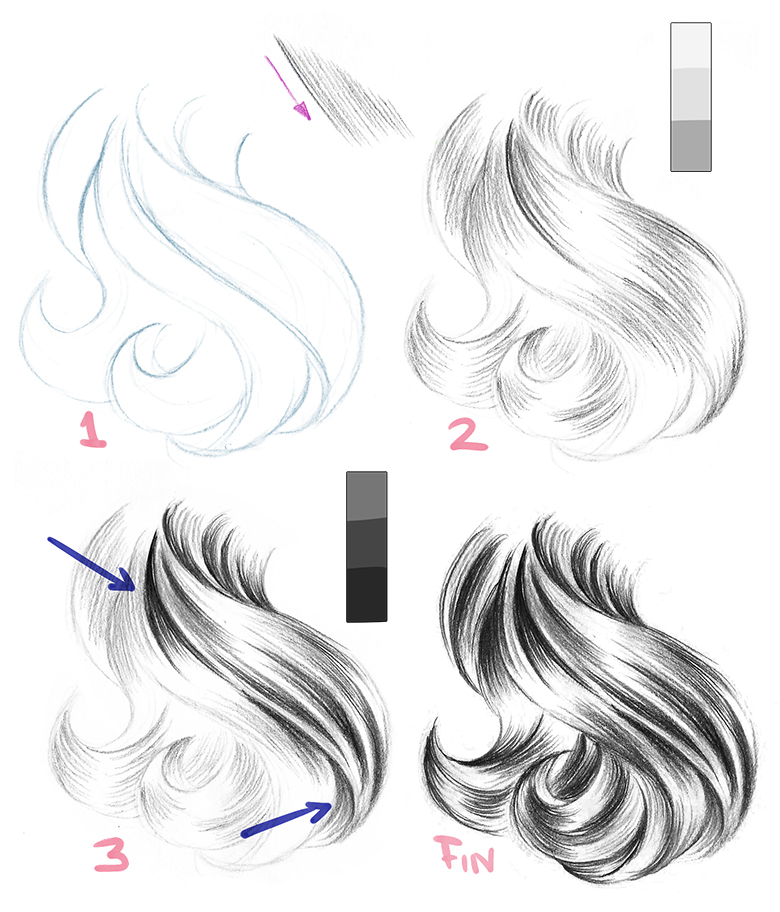
Light and shadow are the true sculptors of hair, defining its texture, depth, and overall shape. Observing how light hits the hair, creating specular highlights, mid-tones, and deep shadows, is critical. These tonal variations not only convey the hair's form but also hint at its material properties – is it glossy, matte, fine, or coarse? I recall my early attempts where I would meticulously draw individual strands, only for the hair to look like a tangled mess of spaghetti. The breakthrough came when I learned to first block in the major light and shadow patterns, treating the hair as a unified entity, before adding any finer lines. This method profoundly changed how to draw hair that looks real in my work.
Capturing texture and flow is the final layer that breathes life into hair. Once the form and lighting are established, you can begin to suggest the specific texture of the hair, whether it's straight, wavy, curly, or coiled. The direction of your strokes, varying their pressure and density, plays a significant role here. Understanding how hair naturally falls and clusters will prevent it from appearing stiff or artificial. By paying close attention to these fundamental elements, you lay the groundwork for a truly convincing and realistic depiction of hair.

Essential Techniques for Capturing Hair Texture and Flow
Once the foundational forms and lighting have been established, the next step in how to draw hair that looks real involves refining the texture and flow, bringing a dynamic and natural feel to your illustration. This stage requires a delicate balance between rendering detail and maintaining the overall integrity of the hair mass. Effective layering and directional strokes are key. Instead of drawing every single strand, focus on drawing groups of hair that follow a natural direction, overlapping each other to create depth. Use longer, sweeping strokes that follow the curvature of the head and the natural fall of the hair, suggesting movement and continuity.
Varying line weight and opacity is another crucial technique. Not all hair strands will reflect light or be equally prominent. Using lighter, almost invisible lines for hair in shadow or towards the back, and darker, more defined lines for prominent strands or areas catching direct light, adds immense realism. In my own practice, I often employ different pencil grades or adjust brush opacity in digital art to achieve this subtle variation. This method prevents the hair from looking uniformly rendered and thus artificial, directly contributing to how to draw hair that looks real.
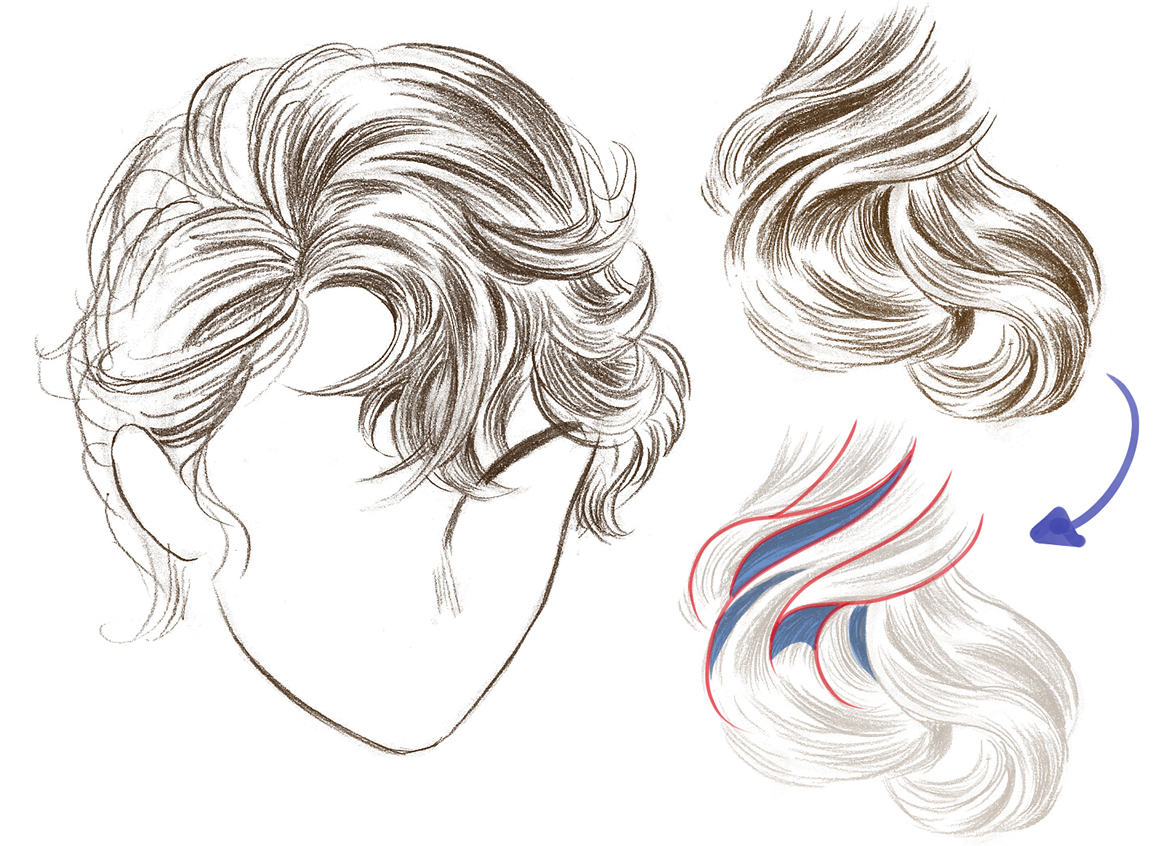
Utilizing negative space can be surprisingly effective for rendering hair. Instead of focusing solely on the hair itself, pay attention to the shapes created between the strands or clumps of hair. These negative shapes can help define the overall silhouette and add a sense of airiness and natural separation within the hair mass. This is particularly useful for depicting flyaways or wisps that break away from the main bulk, contributing to a more organic look.
Finally, understanding the interplay between soft and hard edges is vital for texture. Soft edges, achieved through subtle blending or lighter strokes, suggest hair that recedes into shadow or appears less defined. Hard edges, on the other hand, define individual strands or prominent clumps that are closer to the viewer or catch strong light. Combining these effectively helps to create visual interest and accurately portray the complex textural nuances of hair. For instance, drawing wavy hair involves creating more defined, undulating hard edges for the crests of the waves and softer transitions in the troughs.
Delving Deeper: Advanced Tips for Lifelike Hair
To truly master how to draw hair that looks real, moving beyond the basics into more advanced observational and rendering techniques is essential. One of the most impactful tips I can offer is to observe reference photos critically. Don't just copy what you see; analyze it. Ask yourself: Where is the light coming from? How does it interact with the hair's surface? What kind of texture does this specific hair type have, and how is it portrayed through highlights and shadows? Understanding these underlying principles allows you to extrapolate and apply them to any hair drawing, rather than being solely dependent on the reference.
The role of highlights and specular reflections is paramount in conveying realism. These aren't just bright spots; they are precise reflections of light on the hair's surface, indicating its smoothness, oiliness, and overall health. A common mistake is to render highlights as uniform white streaks. Instead, observe how highlights often appear as broken, elongated shapes that follow the curve of the hair clumps. They frequently taper and vary in intensity, creating a shimmering effect that truly makes hair look real and vibrant. Sometimes, a subtle touch of color within the highlight can further enhance its realism, mimicking subsurface scattering.
Adding flyaways and stray strands is a small detail with a huge impact on realism. Perfectly uniform hair rarely exists outside of a stylized drawing. Real hair has a natural messiness, with small, individual strands breaking away from the main mass, especially around the hairline or edges. These seemingly random elements add organic authenticity and prevent the hair from looking too stiff or artificial. They also contribute to the overall texture and depth of the drawing, making the hair feel more tactile.
Finally, always consider hair color and material properties. A deep, rich black hair will reflect light differently than a fine, silvery blonde hair. The thickness and individual cuticle structure of the hair influence how much light it absorbs or reflects. Experiment with different tonal values and subtle color shifts within the hair to capture these nuances. For instance, brown hair might have subtle reddish or golden undertones that become visible under certain lighting conditions. By integrating these advanced observations and techniques, you will significantly enhance your ability to how to draw hair that looks real and captivate your audience.

Common Pitfalls and How to Avoid Them
When learning how to draw hair that looks real, artists often encounter a few recurring challenges that can hinder the realistic portrayal of hair. Recognizing these common pitfalls is the first step toward overcoming them and producing truly convincing illustrations.
One of the most prevalent issues is what I call the "Spaghetti Syndrome." This occurs when an artist draws individual parallel lines for every strand of hair without considering the overarching form or natural clumping. The result is hair that looks stiff, unnatural, and often resembles cooked noodles rather than flowing locks. To avoid this, always start by defining the major masses and flow of the hair before gradually introducing finer details. Remember, hair groups together, and suggesting these clusters is more important than rendering every single strand.
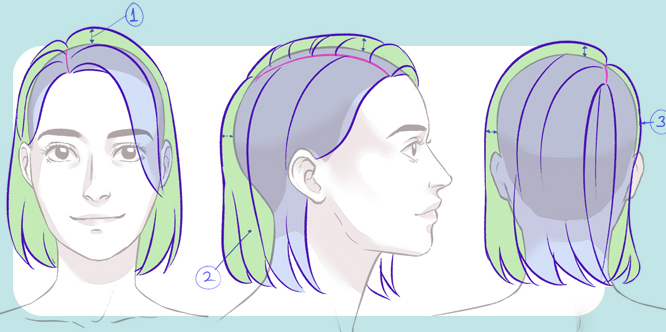
Another common pitfall is a lack of volume and dimension. If hair appears flat against the head, it's usually because the artist hasn't thought of it as a three-dimensional form. Hair occupies space; it has depth and thickness. To combat this, pay close attention to the skull shape and how hair naturally lifts off or drapes around it. Use light and shadow effectively to create the illusion of volume, ensuring that your hair has body and doesn't look pasted on. My own drawings suffered from this early on, making characters look disproportionate until I began to consciously sculpt the hair.
Ignoring the hairline and scalp is another significant mistake. The way hair emerges from the scalp and frames the face is crucial for realism. A poorly defined or abrupt hairline can make the hair look like a wig. Study how hair gradually grows from the scalp, often starting with finer baby hairs or receding slightly in certain areas. Understanding the underlying anatomy of the head helps in positioning the hairline naturally and preventing an artificial appearance.
Lastly, artists often fall into the trap of overworking the details versus focusing on the big picture. While fine details are important for realism, they should only be added once the major forms, lighting, and flow are firmly established. Obsessing over individual strands too early can lead to a messy, overworked drawing that lacks overall coherence. Step back frequently to assess the hair as a whole. My personal experience taught me that sometimes, less is more when it comes to detail; subtle suggestions can often be more effective in making hair look real than exhaustive rendering. By consciously avoiding these common errors, you'll significantly improve your ability to how to draw hair that looks real and achieve a more professional finish.
Frequently Asked Questions About Drawing Realistic Hair
How do you make hair look soft when drawing?
To make hair look soft, focus on smooth transitions between light and shadow, using subtle blending techniques or very light, feathery strokes. Avoid harsh outlines for the main hair mass and incorporate soft edges where hair meets skin or falls into shadow. This approach helps create a gentle, tactile appearance.
What is the best way to draw realistic curly hair?
Drawing realistic curly hair involves understanding its spiral form and drawing each curl as a three-dimensional shape, not just a line. Establish the main direction and volume of the curly mass first, then define individual curls with varying line weights and highlights that follow their helical structure, showing how light wraps around them.
Should I use a specific brush for drawing hair digitally?
While various digital brushes can aid in texturing, no single "best" brush exists; a round, pressure-sensitive brush is often sufficient for most hair rendering. The key is to vary pressure and opacity to mimic natural hair clumps and individual strands, rather than relying solely on a specialized hair brush.
How do I draw hair that flows naturally?
To draw natural-flowing hair, observe how gravity and movement affect hair in real life or through references. Use long, sweeping strokes that follow the hair's inherent direction, showing how clumps overlap and intertwine. Pay attention to the overall silhouette and ensure your strokes align with the hair's natural growth patterns and movement.
What colors should I use for drawing realistic hair?
Realistic hair color is rarely a single flat shade; it comprises a range of tones including a base color, darker shadows, and lighter highlights, often with subtle undertones. Observe reference photos closely to identify these nuanced color shifts and layer them to build depth and realism, considering how light affects the hair's inherent hue.
Conclusion
Mastering how to draw hair that looks real is an artistic journey that prioritizes understanding over mere replication. The key principles involve perceiving hair as coherent masses with distinct forms, expertly utilizing light and shadow to define volume, and carefully layering textures to convey movement and individual character. By embracing these core concepts and consciously avoiding common pitfalls like the "Spaghetti Syndrome" or lack of dimension, you can transform your hair drawings from basic outlines into vibrant, lifelike renditions.
The path to drawing convincing hair is paved with keen observation, consistent practice, and a willingness to analyze the intricacies of what makes hair look real in the first place. I encourage you to integrate the techniques discussed, from critically studying reference photos to strategically applying highlights and flyaways, into your regular drawing routine. Experiment with different hair types, lighting conditions, and tools. Your dedication to understanding hair's complex nature will undoubtedly lead to significant improvements in your artwork. Keep practicing, keep observing, and share your evolving hair drawing journey with us in the comments below.

- 10 Best Hair Oil For Oily Skin Buyer Guide 2026 - October 26, 2026
- 10 Best Hair Oil For Overnight Buyer Guide 2026 - October 26, 2026
- 10 Best Hair Oil For Oily Scalp And Dry Ends Buyer Guide 2026 - October 26, 2026
2 Comments